


Key Points
- Learn how to change keyboard language automatically in Microsoft Office.
- Discover how to switch keyboard language without interrupting your workflow.
- Understand common keyboard language settings and troubleshooting methods.
- Learn why Word may be changing language automatically.
- Find solutions for multilingual typing and keyboard language issues.
Hello and welcome to this week’s tip-of-the-week! If you’ve missed our previous tips-of-the-week, feel free to check them out here.
Today, let’s explore how you can automatically change your keyboard language based on the surrounding text in Microsoft Word, Outlook, and other Office apps. If you often switch between languages like English and Spanish, this hidden Microsoft Office feature can save you a lot of time.
Auto Change Language in Microsoft Office
Instead of manually using a keyboard shortcut to change the language, you can let Microsoft Office auto change language settings detect your typing language and adjust the keyboard automatically.
Change Keyboard Language Automatically in Office Apps
This feature works for Latin-based languages and is available in Word, Outlook, OneNote, PowerPoint, and Publisher. You simply need to:
- Enable the desired language under Language Preferences.
- Set the keyboard layout for each language you want to use.
Steps to enable automatic keyboard language switching
- Open Word, Outlook, or any supported Office app.
- Go to File > Options.
- Select Advanced.
- Under Editing options, check the box “Automatically switch keyboard to match language of surrounding text.”
Now, the keyboard layout will match the language detected in the surrounding sentences without any manual effort.

Once this option is enabled, you will be able to type in various languages without needing to manually change your keyboard language.
Switch Keyboard Language Easily
If you’re wondering how to switch keyboard language easily in Microsoft Word or Outlook without manual steps, this automatic option will help you work faster.
Many multilingual users rely on an auto language switcher to improve productivity and reduce the need to manually change keyboard language throughout the day.
However, you must already have the language keyboard installed via your system settings, and your text needs to provide enough context (a sentence or two) for the switch to occur.
Auto Language Switcher and Automatic Proofing
Bonus Tip: You can also enable automatic proofing!
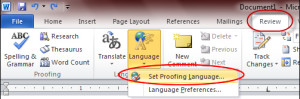
- Click on the Review tab.
- Go to Language > Set Proofing Language.
- Check “Detect Language Automatically.”
This detects the typing language automatically for spell check too — a great addition to multilingual typing!
Microsoft Office Language Settings
Before you can enjoy seamless multilingual typing, make sure to adjust your Microsoft Office language settings properly:
- Set the Editing Language (under Office Language Preferences).
- Install the desired Proofing Tools if needed.
- Adjust your display and help languages if required.
If you ever need to change language settings in Microsoft Office, it’s just a few clicks away in the Options menu.
Related: Microsoft Word Shortcuts: The Basics
How to Change Language in Keyboard Without Interruptions
Many users ask, “How to change language in keyboard without switching manually?” The answer lies in enabling automatic detection through Microsoft Office settings, as explained earlier.
Windows Switch Keyboard Language Shortcut
If you frequently use the windows switch keyboard language shortcut, automatic detection can reduce the need for constant manual switching.
If you prefer manual switching sometimes, remember the quick shortcuts:
- Windows Key + Spacebar
- Alt + Shift
Depending on your settings, either shortcut can help you switch keyboard language instantly.
For users who accidentally modify settings, knowing how to reset keyboard language to English can save time. Simply return to the system language settings and set English as the default.
Related: Pros and Cons Of Switching Your Computer’s Keyboard Layout
Change Language Settings in Word and Outlook
If you primarily work in Word or Outlook and wonder how to change language in Word or how to change language in Outlook, this tip will streamline your workflow.
Both apps allow automatic keyboard and proofing language detection when configured correctly. No need to pause and manually switch keyboard language every time you write a non-English word!
Keyboard Language Change by Mistake and How to Fix It
Sometimes users experience their keyboard language changing by mistake. This usually happens if the shortcut keys (Alt+Shift or Windows+Spacebar) are pressed accidentally. To fix it:
- Go to Settings > Time & Language > Language & Region.
- Remove unnecessary language packs.
- Adjust the keyboard switching shortcut to prevent accidental changes.
If you ever notice unexpected behavior, simply review your keyboard language change settings.
Multilingual Typing and Proofing Tools
For the best multilingual typing experience:
- Always set the editing language for each document.
- Install Proofing Tools for the languages you frequently use.
- Use the automatic language proofing option for Word and Outlook.
- Practice using keyboard shortcuts for fast manual switches if needed.
Exploring Microsoft Office’s powerful language preferences and proofing tools makes switching languages on your keyboard a seamless experience.
FAQs:
How do I get my keyboard to change language automatically?
Enable the option “Automatically switch keyboard to match language of surrounding text” in Microsoft Office Advanced settings.
How do I set my keyboard back to normal?
Open Language & Region settings, select your preferred keyboard layout, and make it the default option.
How to reset keyboard language?
Remove unwanted keyboard layouts and choose your preferred language as the default input method.
How do I change back to my old keyboard?
Go to Language Settings, select your previous keyboard layout, and set it as your default keyboard.
Final Thoughts
Changing your keyboard’s language automatically based on the surrounding text can dramatically speed up your work, especially when you’re switching between English, Spanish, French, or any other Latin-based language. Microsoft Office makes this easier than ever with smart settings built into Word, Outlook, and other apps.
Call to Action
Looking for more language and technology tips? Explore our language resources to learn how multilingual communication, language tools, and productivity features can help improve your workflow and efficiency.
Have questions or other Microsoft Office tricks to share? Drop a comment below!
Related: How to quickly write Japanese on your English-Language Keyboard